I love my white iPhone 5C: It's clean, simple, powerful, and beautiful. The only problem is that the case Apple sells as a companion to this sophisticated piece of technology looks like a preschooler's toy. Yikes. I've kept my eyes open over the past few months of owning the phone for a case that would be equally clean and simple, and if not powerful, at least functional. No dice.
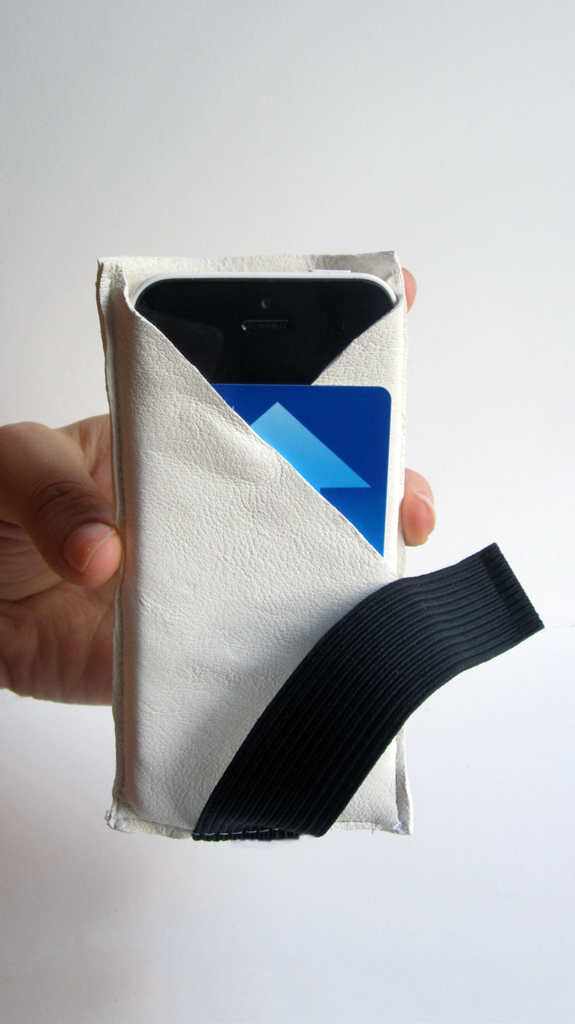
Time to take things into my own hands. The goals were simple: a slide-in-slide-out type of case that could hold my phone (obviously) but also my ID and debit card. I wanted a case that would lock those items in place (heaven knows the last thing I need is a lost debit card) while easily allowing access when I needed them. I didn't want to be fumbling for my phone every time a call came through. I know most phone case/wallet options keep the phone in the case at all times while opening up only at the touch screen. This is the type I had with my old phone and it was very functional ... but I love the iPhone's aesthetics and with a case like this, you never get to see it. What's the point??
For the material palette, I took inspiration from the phone itself: crisp white and true black. I had some white leather from a previous project, and about a foot of 1" wide black elastic, and that's it. If you don't happen to have any leather lying around, might I recommend Sheridan Leather? The exact leather I used was white deer skin, and trust me: you get a lot for the price. It's beautiful and incredibly soft. Make sure you treat it so that it doesn't stain and spot in moisture.
The pattern is this:
1. Measure your phone.
2. Add 5/8" to the width & 3/8" to the height (more or less might be necessary depending on how many cards you want to carry at a time).
3. Cut 3 panels of the leather to the above measurements.
4. Take the first panel and with the right side facing up cut across the piece at a 30 degree angle starting at the top right corner.
5. Take the second panel and with the right side facing up cut across the piece at a 30 degree angle starting at the top left corner.
6. Stack the three panels with the uncut piece on the bottom, wrong side up, then the two angled panels, right side up. Use double stick tape to hold the panels in place. Pins + leather = sad times.
7. Using a machine*, sew with 1/8" seam tolerance down the long sides. Don't sew the bottom seam just yet. Patience, friends. That comes later.
8. Place your phone and the number of cards you plan on carrying in the case. Drape the elastic around the phone, making sure it's centered, and double stick tape in place. Make sure you can easily slide the elastic off to access the phone, but that it doesn't slip off too easily.
9. Sew the bottom seam of the case with 1/8" tolerance.
10. Trim away any excess off the seams. I trimmed mine down to about 1/16th of an inch.
* Make sure you test the stitching on some scrap pieces of leather to ensure you have proper tensioning. Practice makes perfect!


I'd love to see (or hear) how yours come out! I was thinking maybe some different color thread for the stitching could be cool, or even a different color leather for each panel so you kind of get a pinwheel effect. The possibilities are endless!
Good one ........i really like this post
ReplyDeleteLeather Shoes || Leather Bags || Casual Gents Belt || Leather men Wallet
Lovely post! Thank you for sharing!
ReplyDeleteLeather Travel Bag || Leather Jacket in Bangalore || Ladies Purse || Ladies Leather Jacket
Thank you for sharing this post!
ReplyDeleteLadies Wallet || Leather Ladies Bag || Leather Belt || Ladies Clutches
Awesome post! I like this very much
ReplyDeleteLeather Office Bag || Leather Jacket || Leather Wallet || Ladies Bag
I appreciate your presentation and post...
ReplyDeleteleather wallet
Thank you for sharing with us such a useful information!
ReplyDeleteLeather Shoes || Leather men Wallet || Leather Ladies Bag || Ladies Leather Jacket
Very interesting articles sharing Games Blogger Templates
ReplyDelete